In this table you can see all your audios.
You can sort them by clicking on any header column.
Double click on an audio to play it in the OmniSound window.
You can easily edit the Audio Title and the Map Name. Select the audio and click on the cell to edit the text.
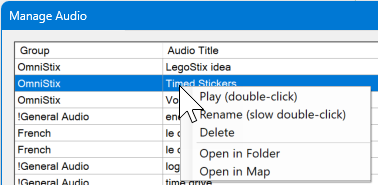
Right-click on an entry to reveal the following menu:

Play: play the audio. You can also double-click on the audio to play it.
Rename: rename the Audio Title or Map Name (depending on the selected cell).
Delete: delete the selected audios.
Open in Folder: open the audio file in the Windows Explorer.
Open in Map: open the map with the topic selected if the audio file is associated with a map topic.
The menu may appear differently depending on the selected cell in the Manage Audio database table. For example, if the audio file is not associated with a map topic, the Open in Map option will not appear. Also, the Rename option will not show if a cell from the Group column is selected.
Click the Manage Group button to open the following panel:

Add, Rename and Delete a group using the buttons on the top right of the window.
Click the Add from file button to open the following panel:

Select the Group into which you will add the audio file.
Provide the Path to your audio file. The Audio Title will generate automatically. You can change it.
Click Add to add the audio to the database.
Plays the selected audio. You can also double-click to play the selected audio file.