OmniSound adds audio functionality to MindManager.
With OmniSound you can:
Click the microphone icon in the OmniStix Start Menu to open the OmniSound dialogue:

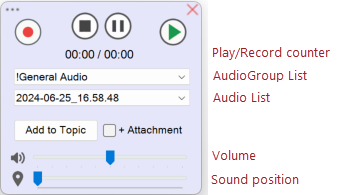
The top row buttons control recording and playback.
Left to right:
Click the red button and start speaking.
The recording button flashes when the recording is in progress.
Note the time-related text below the buttons:
Click the Pause button If you are distracted (eg., you have a call). The record button will stop flashing.
Click the Pause button again to resume recording. The red button will begin to flash again.
Click the Stop button (black square) to stop and save recording.
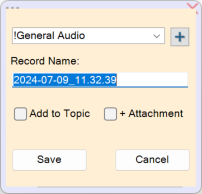
A panel will appear:

Choose the Audio group to save the recording to.
Or click on the + icon to create a new group,
The record name field displays the time of the recording (year-month-day_hour_minute_second). In this example, the recording is saved as"2024-07-09_11_32_39.mp3" file.
You can change the recording name.
Check the Add to topic option to add the created audio file to the selected map topic.
[If the voice note on a topic is your initial task, you can record a voice note from the topic's context menu without opening the Omni-Audio window! See here.]
The record will be added to the selected topic with an audio-icon:

Click on the icon to play the audio.
What happens if users open this map on another computer?
If the OmniStix is installed on Computer 1, the Audio icon displays on the topic but will not play because the audio file is not stored on this computer.
If the OmniStix is not installed on Computer 2, the icon will not be visible.
In these situations, you can check the + Attachment option to add the audio file as a topic attachment.
Click on the Audio icon on the Computer 1. OmniStix will take the audio file from the attachment and play it.
On the Computer 2, click the topic attachment. The audio will open and play in the MindManager browser.
Note: Don’t get carried away with adding audio attachments to the map! Each minute of voice recording averages 120-150 KB. And if you record system sound (sound from a webinar), then every minute will add 1MB to the map! Use audio-attachments only if you are going to open the map with audio notes on another device.
Click the System Sound option in the More button menu to record system sound:

The recording icon changes:

Then, work as described in the Create a Voice Note section.
Remember, you can pause and continue the recording at any time to avoid recording unnecessary sections of a webinar or presentation.
Note: System sound only record when there is sound to record. If there is no sound (eg., you paused the webinar), OmniSound does not record anything. When you unpause the webinar, recording automatically continues.
To switch to the voice recording, go to the More button and click the Microphone command.
Select an audio item from the Audio List.
Click the Play button (green triangle).
Use Pause and Stop buttons to control playback.
The left counter numbers show the current audio-track time.
The right counter numbers show the total audio duration.
You can adjust the Volume.
Use the Sound position track-bar to rewind or forward.
Choose the audio from the Audio list.
Click the Add to Topic button to add the audio and audio-icon to the selected topic.

Clicking on the icon will play the audio.

Click on the top left button to reveal a list of commands.
Manage Audios: open the Audio Recordings database. There you can view and find your audios, edit them, and manage audio groups. See here.
System Sound: enable system audio recording. See the Record System Sound section. The command name changes to Microphone.
Microphone: enable microphone recording. The command name changes to System Sound.
Add New Group: open the Add New Group window.
Help: open this help page.