TextStix
The TextStix provides users with a fast and convenient place to:
CLICK ON an element in the picture for an explanation of how it works.

Head Icon
Paste as Topic
Paste text from the clipboard as a subtopic of the selected topic.
Right-click on the button opens other paste options:
Paste Link
Paste text from the clipboard to the selected topic as a link.
Paste Topic Notes
Paste the clipboard text into the Topic Notes of the selected topic.
Working with the topic text
The left button with the yellow triangle copies the text of the selected topic to the clipboard. If you select multiple topic, OmniStix merges their text and copies the result to the clipboard.
The right button with the blue triangle pastes the text from the clipboard into selected topic(s).
Set of options to work with text
TextStix provides options that allow users to choose:
In this set you visually configure text pasting options and thus control how text will be pasted.
The five buttons within the yellow options block act as toggles for the available options.
Click on a button to select an option and notice that the buttons change to visually represent the option:
 Work with UNformatted text. Text to the topic or topic notes will paste unformatted.
 Work with formatted text. Text to the topic or topic notes will paste formatted.
 Replace text. The pasted text will replace the text of the topic or topic notes.
 Add text. The text will be added to the end of the topic text or topic notes.
 Paste as a single topic. Paste multiple paragraphs as a single topic. (Note that MindManager will paste multiple paragraphs as multiple topics).
 Paste as multiple topics. Paste multiple paragraphs as multiple topics (each paragraph per topic).
 Link to the Source. Text copied from a web page is added without a link to the web page.
 Link to the Source. If you copy text from a web page, a link to that web page is added to the topic. If you insert a topic into Topic Notes, the link is added to the end of the notes.
 Links in the text. If links are in the pasted text, they will NOT be added to the topic or the topic Notes.
 Links in the text. If links are in the pasted text, they will be added to the topic or the topic Notes.
Search and Replace
When you replace some text in the topics with the MindManager Replace tool the topic text formatting cracks up.
This function replaces text maintaining the text format. (There are exceptions. For example, when you select text that contains multiple formats - here are multiple formats - Search and Replace will not preserve it).
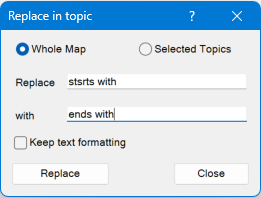
The window will open:

You can choose to search and replace text in Selected Topics or across all map topics.
You can also choose to keep the text formatting when replacing text. (If the text format is not important, replacing the text in a large map will be much faster).
Clear formatting
Clear the text formatting of the selected topics and apply the default text formatting.
Topic Width
When you type or paste topic text, the topic maintains the default topic width of 6-7 cm. You must manually adjust the topic width or height to prevent topics from looking untidy or taking up too much space on the map.
This button lets you to set the defined width for all selected topics at once with one or two clicks.
You can also apply the topic auto-width feature to change the topic width automatically if the number of text characters exceeds a defined number. Topic Auto-Width is enabled and configured in the OmniStix Settings
Left click on the button: the preferred width will apply to the selected topics. It is set in the Manage Topic Widths window (see below).
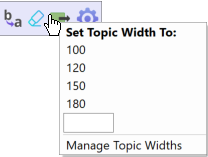
Right click on the button to reveal the context menu:

Set Topic Width to: click on the desired width to apply the width to the selected topics. Use the Manage Topic Widths window (see above) to configure these values.
Also, you can enter a custom topic width (in mm) and press Enter to apply the width to the selected topics.
Manage Topic Widths opens the window:

Specify a value that apply the topic width when you left-click on the button.
Set the rest values and select the widths to show in the button context menu.
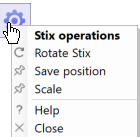
Manage Stix button

Rotate Stix: rotate the Stix horizontally/vertically.
Save position: remember the Stix's screen position. The next time you launch the Stix it will appear in this position. OmniStix links the saved position to a specific screen (if you have two screens - a laptop and monitor), you can remember the position for each screen separately.
Scale: increase/decrease the current Stix between 100 - 300%.
Help: opens the OmniStix Help section for the current Stix type.
Close: close Stix.