TaskStix
The TaskStix almost completely replaces the MindManager Task Info task pane, allowing users to quickly and conveniently assign task attributes to map topics. It also preserves the entire screen area for displaying the map and provides users with several cool features.
To see how the Stix buttons works, CLICK ON THE INTERESTED BUTTON.

Head Icon
Grab this icon with the mouse to move a Stix.
Hover the icon - the name of the Stix will appear.
Double-click the icon to hide the Stix panel.
Progress 100%
Adds a Progress 100% icon to the selected topics.
Progress 0%
Left-click: adds a Progress 0% icon to the selected topics.
Right-click: reveals other Progress values. Click the needed one to add it to the selected topics.
Priority
Left-click: adds a Priority 1 icon to the selected topics.
Right-click: reveals other Priority values. Click the needed one to add it to the selected topics.
Resources
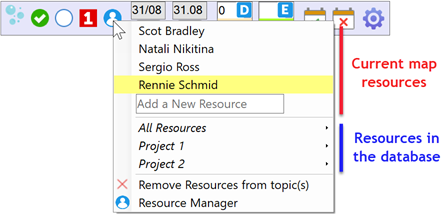
Click on the icon to open the Resource menu:

At the top - all existing Resources in the current map. Click on a Resource to add it to the selected topics.
Also, you can Add a New Resource - type the resource name and click Enter to add Resource to the map and the selected topics. You can enter several Resources separated by commas.
Below you can search for the resource in the database and add it to the selected topics.
Remove Resources from topic: removes all Resources from the selected topics.
Resource Manager: opens the Manage Resources window. Described here.
Start Date and Due Date
A topic has no Start Date or Due Date when the toggle at the bottom of the respective control is toggled Off. The Start Date is activated in the image above while the Due Date is deactivated
To set the Start Date or the Due Date to the topics, apply one of the following actions:
1. manually enter the date in the button date field. Or
2. choose the date from the calendar. Or
3. click the toggle to the On position.
To remove the Start or Due Date from selected topics switch the toggle to Off.
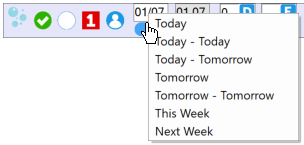
Special feature: right-click on the date part of the button to reveal the relative dates menu.

Today: sets the today date as the Start or Due Date (depends on which button is called from).
Today - Today: sets the today date as the Start and Due Date.
Tomorrows: the same as Today, but with tomorrow.
This Week: set the Start Date to Monday and the Due Date to Friday.
Next Week: set the Start Date to Monday next week and the Due Date to Friday next week.
Task Duration
Click the bottom of the button to select the Duration unit (Minutes, Hours, Days, Weeks, Months).
Set the number of units at the top of the button and press the Enter key, or click the D button.
The Task Duration you specified will be applied to the topic. If there are no dates on the topic, the start date will be the Today, and the due date = Today + the Duration).
Task Effort
Click the bottom of the button to select the Effort unit (Minutes, Hours, Days, Weeks, Months).
Set the number of units at the top of the button and press the Enter key, or click the E button.
The Task Effort you specified will be applied to the topic.
To remove the Effort from a topic, enter 0 (zero) or remove the entire value (empty field).
Quick Topic
This powerful feature provides users with the ability to assign several attributes to a topic with one or two clicks. For example, set the required dates, Progress, Priority 1 icon, resources and other icons, in a default template and click the Quick Topic button to insert them into the topic(s).
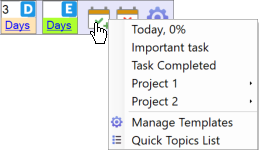
Right-click on the Quick Topic button to reveal the context menu:

The upper section of the context menu lists the Quick Topic Favourites templates, followed by Quick Topic Groups. Click on the desired template adds the attributes defined in this template to the selected topic.
For example, the Today, 0% template adds today's Start and Due dates and a Progress 0% icon to the selected topic(s). The Important Task template adds today's Start and Due date and a Priority 1 icon to the topic.
These are very simple templates. Users can create more complex templates to meet specialised needs.
Left click on the button applies the first template from the Favourites group (in this case - Today, 0%).
Manage Templates: open the Quick Topic Templates window to create and manage the QuickTopic templates.
Quick Topic List: opens the Quick Topics window. If you expect the intensive work with quick topics, this window is more convenient way to work with Quick Topics. Described here.
This is kind of the opposite effect compared to Quick Topics. There we quickly set the necessary topic info. Here we quickly remove unnecessary topic info.
The Right-click on the icon shows what attributes will be removed from the topic when you click on the button:

Check-in the topic info you want to be removed.
The Left-click on the button will remove checked topic info from the selected topics.
Make the default: remember the checked items. They will be applied the next time you launch MindManager.
Stix Manage Button

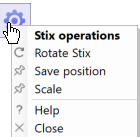
Rotate Stix - rotate the Stix horizontally/vertically.
Save position - remember the position of the Stix on the screen. The next time you start the Stix it will appear in this place. The position is remembered for a specific screen. If you have two screens (laptop and monitor), you can remember the position for each screen separately.
Scale - increase/decrease Stix panel size. Allowed scale: 100 - 300%.
Help - OmniStix Help section for this Stix.
Close - close the Stix.