|
Results of the data collecting
|


|
|
Results of the data collecting
|
|
The results of the data collecting can be displayed either in the map (Collect to Map) or in the Collection Results window (Collect to Results Window).
This is determined by the option located in the Data collection group. Clicking on the option switchs the data collection container from the Collect to Map to the Collect to Results Window and vice versa:
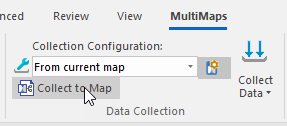

The Collect to Map option in the Collect Data button menu must be checked.
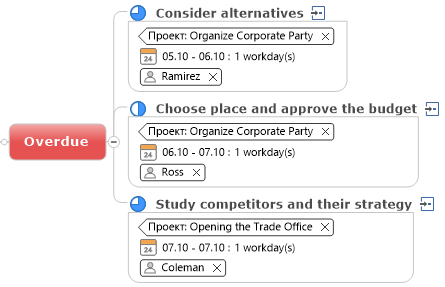
For example, we want to collect overdue tasks from several projects. Let's create a topic with the Overdue keyword. Today is October 9th (09.10), and we're starting data collection by selecting this topic and clicking the Collect Data button. The search returns the following result:
Note 3 things:
1. Each topic has a tag from the tag group Project. This group automatically populates when data is collected. The search process names tag from the task’s source Map name (Central Topic), thus helping the user find the task's source map and context. You can disable this functionality in the data Collection Configuration.
Note: MindManager 21 and 22 do not have the Show tag group names option enabled by default (this could be a bug). We cannot override this default. Therefore, check the parameter Tag Group Names (View tab - Show/Hide) if you do not see tag group names on topics.
2. All topics/tasks contain links to their topics in the source maps. Use them to open the original topic and check the task's context.
Also, MultiMaps uses this hyperlink to send the changes back to the originals (see this section).
It is crucial to remember that you should not add your hyperlinks to the collected topics! Otherwise, you cannot send changes to the source topics.
3. The formatting of collected topics is constant for shape, color, font, etc. However, the formatting may be different in the original map. For an explanation, see the Copy rules section.
You can also toggle a setting that can copy individual topics/tasks and their subtopics into the collection template (the whole branch). For example, the keyword In-Tray (in the Data Collection Configuration Map) collects the complete topics branches labeled as In-Tray. Read the details in the Data Collection Macro language description.
In this case, the data will be collected into a separate window.
In the upper part you see the collected topics list:
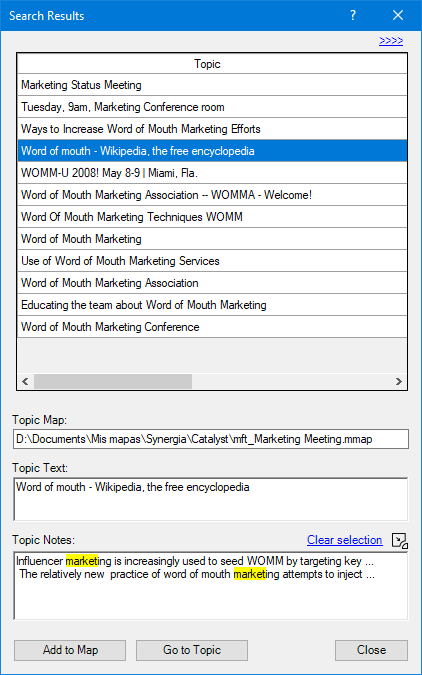
Below you can see the path to the map containing selected topic, the full topic text, and the topic notes (if any).
You can review the topic notes in a separate window (this is very convenient if the notes
contain a lot of text). To do this, click the icon  .
.
If the collection criterion was a text, that text will be highlighted in the Topic Text and Topic Notes boxes. (If you need to remove this highlighting, click the Clear selection command).
The Go to Topic button opens the map of the selected topic, and select the topic in the map.
The Add to Map button adds the selected topics (you can select multiple topics) to the selected in the map topic with full topic information: icons, tags, resources, etc.
If you collect topics with task attributes (Priority, Progress, Resources, Dates), you can expand this window (click on the button >>>> ) and see these attributes:

The second (Pri) and third (P%) columns are the Priority and Progress values.
Click on the column header to sort the list by the column values.
 If you select the whole list (Ctrl + A) and copy it (Ctrl + C), it can be correctly inserted into the Excel table, with the column titles.
If your collection criteria are the links or attachments, results can be displayed in a special Links Window:
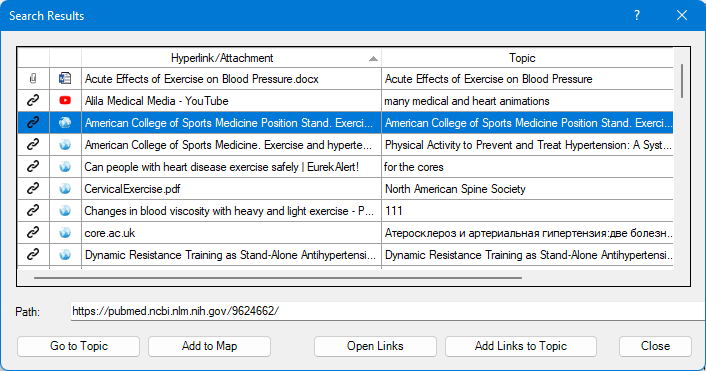
The first column shows the link type - hyperlink or attachment.
The second column displays the linked document type.
You can sort the first and second column (click on column top).
The third column is the title link or attached file name.
The fourth is the name of the topic this link belongs.
The fifth (hided here) is the name of the map this topic belongs.
In the Path box you can see the full link path.
Go To Topic opens the map of the selected topic and select that topic in the map.
Add to Map adds selected topics (you can select more than one) to the selected map topic with full topic information: icons, tags, resources, etc.
Open Links opens the selected links in the corresponding app (browser, Word, Excel, etc.).
Add Links to Topic will add the selected links to the selected map topic.
* Displaying the results in this window is defined by the operator tolinkswindow.
Note: collection by templates (Collect by Template in the Collect Data button menu) is carried out only into the map (not to the Results Window)!
After collecting data, you can recollect (refresh) any branch with a keyword (keywords). For example, you collect data from many maps (say, 30) using the Next week template on Friday. On Monday, you start to work with it and find that a project has some new questions.
It is not necessary to rebuild the whole map. You only need to select the topic labeled Questions and click the Collect data button. MultiMaps will recollect data, but only for the keyword Questions.
If the data was collected into the Results Window, it will be updated there.
The collected results in each collected branch are sorted by projects (more precisely, by maps from which data was collected).
Using the sorting functionality on the MultiMaps command ribbon, you can sort a branch according to the criteria you need.
Also, you can use the data collection macro language in the collection topic, which will sort this topic branch automatically, immediately after collection.
In the results window, sorting is done by clicking on the desired column of the topic list.
After the collection process, MultiMaps adds a note to the Central Topic* of the map. These notes may contain the following:
* If the data collection uses the selected topic/branch with keywords (via Collect data command) and does not use a template, it will add statistics to a callout topic of the collection topic. This callout will contain notes where you may see the collection statistics. Select the Add statistics option in the Data collection dialog window to enable this feature (see the previous section for details).
Suppose the data collection results are no longer accurate. You can remove all collected topics, and the callout topic's statistic notes from the collection branch with one click.
To do this, select a topic whose branch you want to clean (in the above example, select the Overdue topic), and click the Clean button on the MultiMaps ribbon.